To use a square scarf as a hat band, fold it into a strip, place it around the outside of the crown and tie the ends where you want the detail to sit. Begin with a hat that already fits comfortably. The scarf should add colour and pattern without needing to pull the crown into a different shape.
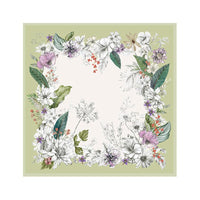
The WomanScarf colourful feather-print square scarf offers a specific design to try. Its description identifies polyester satin and lists approximately 90 × 90 cm, also described as 35 inches square. The gallery shows contrasting borders and a large central illustration. No hat is pictured, so the hat-band arrangement here is a styling suggestion rather than a demonstrated fit.
Start with the hat's existing shape
The crown is the raised part of the hat above the brim. Look at its lower outside edge and notice where an existing decorative band sits, if there is one.
Choose a hat you are happy to wear on its own. Put it on first, then take it off before arranging the scarf. This gives you a familiar reference for how it feels and looks without an extra layer.
Look for a comfortable route around the outside of the crown. A pronounced taper, raised decoration or uneven surface may make that route less straightforward than a plain crown does.
Leave fixed trim in place. If the hat already has a ribbon, compare the scarf laid over or just above it without removing the original. You can decide whether the extra layer adds something you like before making any permanent change.
Decide how much of the scarf to show
Lay the square flat so you can see the border and centre. Bring two opposite corners together, then fold or roll the triangle into a band, keeping the folds even enough to arrange comfortably.
Try a narrow band first, then unfold and compare a broader one. A narrow strip leaves more of the crown visible. A broader strip displays more fabric but may cover the hat's original trim.
The blue gallery reference has a bright pink outer border. You can leave a line of that border visible along the folded strip, or choose a fold that brings more of the blue ground forward.
Do not expect the whole central illustration to remain readable in a narrow band. The hat-band format uses fragments of the print. If seeing the complete design matters more to you, another way of wearing the scarf may be a better choice.

Place the folded band around the crown
Rest the middle of the folded scarf against the outside of the crown, with the ends travelling around opposite sides. Keep the band at a similar height as you bring the ends towards the intended tying point.
Sew DIY demonstrates a hat band made with a folded square scarf. For your own combination, use the actual crown and scarf to judge the available length rather than assuming every square or hat gives the same result.
Let the scarf follow the shape instead of pulling it into place. If it climbs higher on one side, lift and reset that section. A narrow fold may follow some crowns more neatly than a wide one.
Look at the brim too. The band should rest where you intend it, rather than drawing the brim upward or pushing a fold of scarf beneath it.
The listed square dimensions do not describe the finished length of every fold. Check that the ends meet with enough fabric for the knot you want before tightening anything.
Choose a side knot or a back knot
A side knot makes the tying point part of the visible decoration. A back knot leaves a plainer front view and lets any tails hang behind the crown. Compare both by turning the hat, rather than rebuilding the whole fold each time.
Begin with a simple tie that you already know how to undo. Keep it gentle and make sure the ends have enough usable length. If they only just meet, do not force a large bow.
A bow adds loops as well as tails, using more fabric at the tying point. It may look quite different from a compact knot even when the folded band stays the same width.
Settle the knot against the scarf, then look at the crown again. If the hat has changed shape, release the tie and reset it. A decorative band does not need to cinch the crown tightly.

Make the tails part of the decision
Let the ends fall naturally after tying, then look at their length relative to the brim. Long tails may be the feature you want, while shorter visible ends can give a quieter finish.
With a side knot, check whether a tail falls into your normal line of sight when the hat is worn. With a back knot, notice where the ends rest against your hair or collar.
Try the hat with the top or jacket you intend to wear. A hanging scarf end may sit differently over a high collar than it does over a plain neckline.
If the tails are more prominent than you wanted, compare another fold or a simpler knot before adding extra wraps. Leave the scarf intact; there is no need to cut it to create a particular photographed outline.
Put the hat on again before settling on the look
Once the band is arranged, put the hat back on in its usual position. Compare the fit with the reference you noticed at the start.
Look straight ahead and turn your head as you normally would. Notice the knot, the ends and the way the scarf rests around the crown. Check that you can take the hat off and put it back on without repeatedly rebuilding the decoration.
If the band moves, lift and reset it on the removed hat. Do not keep tightening the knot as the only solution. Some combinations of crown shape and scarf fold may simply be inconvenient.
This decorative trial does not establish wind retention or make a loose hat fit correctly. Keep the hat's own fitting arrangements separate from the scarf styling.
Compare the gallery colours with your hat
The gallery includes a blue ground with pink edging, a pink ground with blue edging and other colour references. These are separate pictured appearances; a photograph does not establish which can currently be supplied.
A contrasting border can form a clear line against a plain crown. A quieter pairing may let the hat remain the main shape while the scarf contributes a small patch of print.
Use the actual hat when comparing options. A colour that looks strong beside the brim in a close photograph may appear subtler when you see the complete outfit.
The pink gallery example helps show how changing the ground and border changes the balance. It is useful as a design reference, rather than proof of an exact screen-to-fabric colour match.

Frequently asked questions
Will a 90 cm square scarf fit around every hat?
That is not established. The crown's circumference, the fold and the length used by the knot all matter. Compare the actual hat and scarf before relying on the listed square size.
Should the knot be at the side or the back?
Either is a styling option. Compare the front view and where the tails fall when the hat is worn. Choose a position you find comfortable and easy to arrange.
Can I use the scarf to make a loose hat smaller?
This guide uses the scarf as outside decoration. It does not establish a sizing adjustment. Start with a hat that already fits and use its intended fitting method.
Is this scarf silk, and does it include a hat?
The description identifies polyester satin, not silk fibre. The featured item is the scarf; this guide proposes a combination with your own hat.
Keep the hat recognisable beneath the band
Choose the fold width, knot position and visible tails together. A useful result adds a new detail while letting the hat keep its familiar shape and fit.
View the colourful square scarf to compare the design references. For sample, wholesale or customization enquiries, contact WomanScarf with your preferred image and the details you need confirmed. Request current options and a quotation; a displayed zero price is an enquiry state, not an offer of a free scarf.